With this in mind, I considered how many thousands of times UGU's doors had been opened and closed in the past 43 years, and why they now showed signs of wear and would no longer hold open.
This used to annoy the life out of both my wife and I. It was as if UGU was attacking us with her doors every time we tried to get in and out. Even on a flat surface the doors would close hitting us on the shin or another part of the leg! I had no idea why the doors would't stay open so I posted the question on the Facebook group W(A)114/115, and the guys there told me that my check straps were knackered.
For those that don't know what a check strap is, just like I didn't, the check strap is that flat metal bar that you see below the interior light switch in the door reveal which I have referenced in a previous post. That metal bar connects the door to the main body structure of the car and serves two purposes: the first we have mentioned, to hold the door open, and the second function is to stop the door opening too far if caught be a strong wind for example. Without the check strap the door would swing around and hit the front wing damaging the bodywork.

Check strap connection to main body towards bottom of image
I have not been able to determine if the /8 has different strength check straps. At this stage I do not believe that they do, even though the coupé doors are significantly bigger than the sedans, which I would imagine would put more stress on the check strap. Perhaps this is why coupé's seem to all suffer from this problem.
A simple way to check if your car's check strap is broken is to try and wiggle the check strap. It should not move from side to side; if it does, it is broken.
So, with the problem identified, what to do next? Get replacement parts...
I got on the phone and rang a few different MB parts suppliers. Initially I was looking for new parts, but after being quoted $300AUD each I started looking for good second hand parts despite being told that I was wasting my time as they would just fail again. Let me tell you, this is not true, second hand parts can work just fine! Two years later I still have had no issues with my replacement parts.
I eventually sourced one unit in Arizona, USA via Ebay. Even though I need two, I decided one was better than none, so when it arrived the next week I decided to attend to the passenger door first. This made sense as only I ever open the drivers door and am more likely to forgive UGU for attacking me with her door - I find it hard to hold a grudge with her.
To access the check strap you first need to strip down the interior door trim; map pockets, arm rest, window winder and door card to name a few. Despite their age, every single piece unscrewed and unclipped with ease. This was one of the first DIY jobs I attended to with UGU, and it was my first real appreciation for the renowned Mercedes-Benz build quality.

Passenger door with interior trim removed
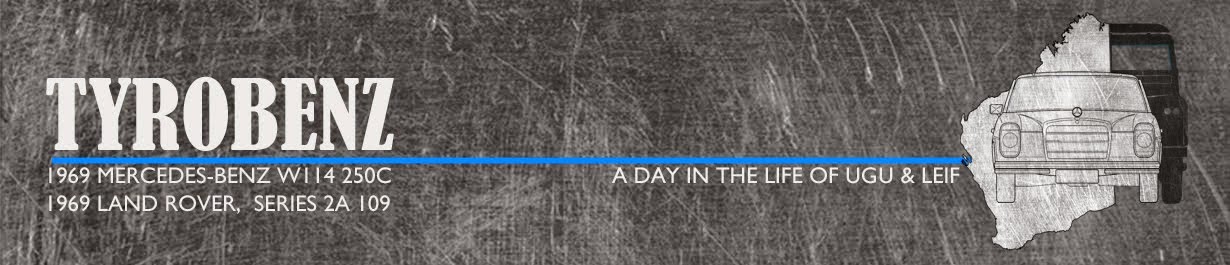
With the trim out of the way, I fished about in the bottom of the door removing the dirt and muck that had gathered over the years. It was here I found the first part of the broken check strap; it was very broken, smashed to smithereens in fact.

Remnants of original check strap

This is what it is supposed to look like
To remove the check strap from the main car body, remove the c-clip on the bottom side of the retaining pin and pull the pin upwards. At this point it is worth using something to hold the door open as it will want to close and it will keep hitting you, either tie the door to something, or prop it open. In true tyro fashion I used a wheelie-bin to prop it open, haha.
Next, undo the two bolts on the edge of the door and the single retaining screw on the inside face of the door. That is it. Pull out the old check strap and have a look at what you have, and I bet it will be scrap.
Before installing the replacement part I would recommend cleaning it, re-greasing it, and if you are precious, painting the check strap the correct colour as it should be body coloured.
Whilst the door is stripped down it is also worth a good clean and investigation of the rest of the door inner parts such as the window mechanism and door lock.
To install the new part I retraced my removal steps. I loosely bolted and screwed the check strap to the door and set about connecting the metal bar to the car body. Physics was never my strongest subject, but at this point I realised how the weight and momentum of the door makes opening and extending the check strap effortless. Doing this when you only have a tiny metal bar to pull on isn't so easy! Only when you have finally extended the check strap to a point where it can reach the main body fixing point, whilst allowing you to fit between the car sill and door will you be able to line up the retaining pin. Push the pin all the way through the main body fixing and secure it with the c-clip you removed as one of the first steps.
With this done you will be able to open the door and fully extend the check strap (if you have not done so already). If the new part is working the door will now stay open unassisted.
You can now tighten up the bolts and screws firmly, securing the check strap casing to the door.
Open and close the door a few times and make sure there are no grinding or groaning noises. Also make sure the door is not hitting the wing when fully opened, and that it will stay open. If all looks good, refit the interior door trim and that's it, job done.
Approximately 6 months past before I was able to attend to my drivers door as I struggled to find another replacement. It was only after talking to a fellow member of my local MB car club that we realised that the check strap casing is the same as on a W108 which he coincidently had as a parts car.
The W108 check strap casing turned out to be the same as the W114, however the metal arm was a different length, shorter from memory. This is an easy problem to overcome and this is how:

Strip down interior door trim, and prop open the door (wheelie bin worked for me)

Remove what is left of the existing check strap. It made sense that the drivers side had suffered more wear than the passenger side

This is one of the wheels from the existing check strap. As you can see this wheel has not turned properly for years. Instead it has just ground up and down the casing creating these flat spots
Using a large flat head screw driver and hammer tap the top and smallest level of the spring out of the casing. With this removed all pieces come loose and can be moved out of the way allowing the metal arm and connecting wheels to come free.
Top level of spring removed allowing all parts to become loose
The wheels on the arms are not physically connected to the metal arm, they fit onto a pin and once in the casing everything keeps in place.

Reassembled check strap (as mentioned before the metal arm is supposed to be body coloured but I like the shiny metal look)
Note: The metal arm has a specific curvature to allow it to open with the swing of the door. If this is not put in incorrectly it will not work and you risk breaking the check strap and undoing all your hard work so please take care, and take note of the position of the original before you take it apart. I learnt this the hard way and had to take it all apart again, but thankfully didn't break anything.
With the newly completed check strap, fit and test as per previous instruction.

UGU basking in the 38+C degrees with her door open unassisted, hurray!
No comments:
Post a Comment